Magic Monitor (Magic xpi 4.13)
The Magic Monitor lets you manage and monitor the Magic infrastructure, and to get accurate information about your projects, from a single intuitive and easy-to-use dashboard. You can view the information for the whole project or you can select different levels within the project, and you can use filters to display information from specific times. The information displayed is updated regularly. The status of each project is taken from the Space.
The information provided by the Magic Monitor lets you examine the project and see where you need to make any modifications to improve performance. For example, you can identify issues caused by heavy data loads or by a possible shortage of licenses.
The Magic Monitor also provides you with alerts to problems when they arise. For example, an engine that is running on an alternate license, or that the Space's status has been compromised.
In addition, you can make adjustments to the servers without having to go back to the Magic xpi Studio to reconfigure your project.
|

|
-
The Magic Monitor locates the Space using the settings defined in the runwebmonitor.bat file, which is located under the <Magic xpi installation>\Runtime\RTView\magicmonitor folder.
-
The Magic Monitor is based on a database table called ifs_actlog that stores all of the records.
-
For information about how to change the location of the projects folder, click here.
|
You open the Monitor from the Windows Start menu's Magic Monitor shortcut. By default, this link points to the local host. You should change it to link to the host running the Magic Monitor services, as follows:
-
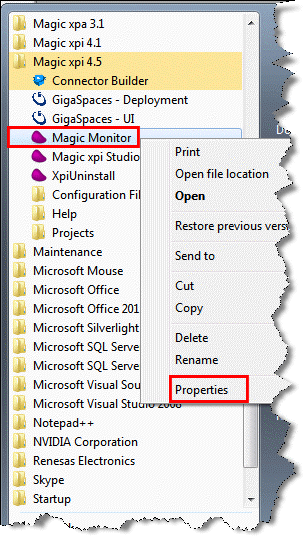
Right-click the Magic Monitor shortcut in the Start menu.
-
Select Properties.
-
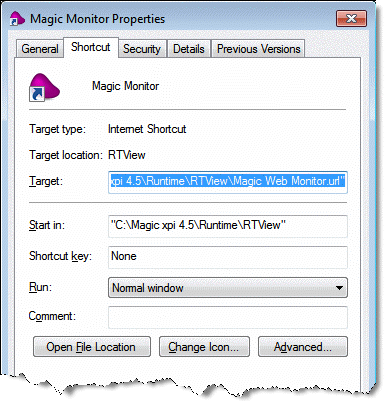
The Magic Monitor Properties dialog box opens.
-
Change the URL to point to the host running the Monitor services. If, for example, the host that runs the Monitor services is 10.1.3.75, you would change the URL to: http://10.1.3.75:8068/magicmonitor/panels.jsp
|
|
-
By default, the Magic Monitor Web Server uses port 8068. To change this port, open the <Magic xpi installation>\Runtime\RTView\base\conf\server.xml file, and then change the Connector port parameter to any non-SSL HTTP/1.1 port.
-
The Web Server for the Magic Monitor Display Server can be changed by setting the WEB_SERVER_LOCATION system property in the environment variables. This property will be in the root folder location for the Web Server. If the property is not set then the default location for the Web Server will be used.
|
Remember that only one of the machines should run the Magic Monitor Display Server service.
The Magic Monitor shortcut will open a link in a browser and the following login screen will appear. The login screen provides the user an option to stay logged in and keep the Magic Monitor session active. If the Keep me logged in checkbox is unchecked, the user will be logged out after 15 minutes of inactivity.

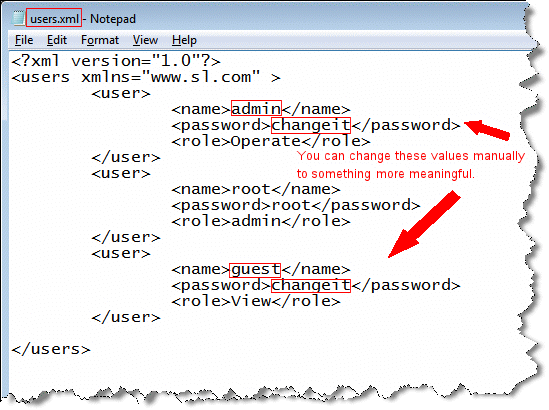
Three default users are set statically during the installation process. The login details for these users are:
-
User 1: Operator. The operator can start and stop projects:
-
Username: admin
-
Initial password: changeit
-
User 2: Viewer:
-
Username: guest
-
Initial password: changeit
-
User 3: For internal purposes only:
-
Username: root
-
Initial password: root
These users are defined in the <Magic xpi installation>\Runtime\RTView\magicmonitor\users.xml file. In the users.xml file, you can change the predefined user names and passwords, as shown below. The user names and passwords are case sensitive. Make sure that you save the users.xml file once you have made your changes.
|
| Once a new user is added to the users.xml file, you need to restart the Monitor service either by running the <Magic xpi installation>\Runtime\RTView\magicmonitor\runwebmonitor.bat file or by stopping and starting the Task Manager > Services > Magic xpi Monitor Display Server service. |
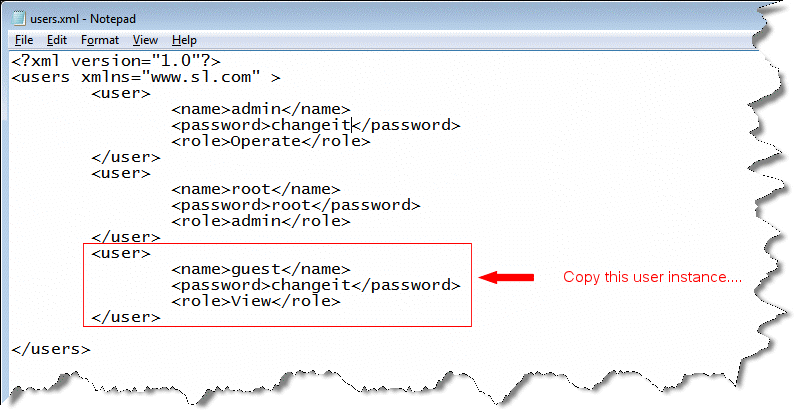
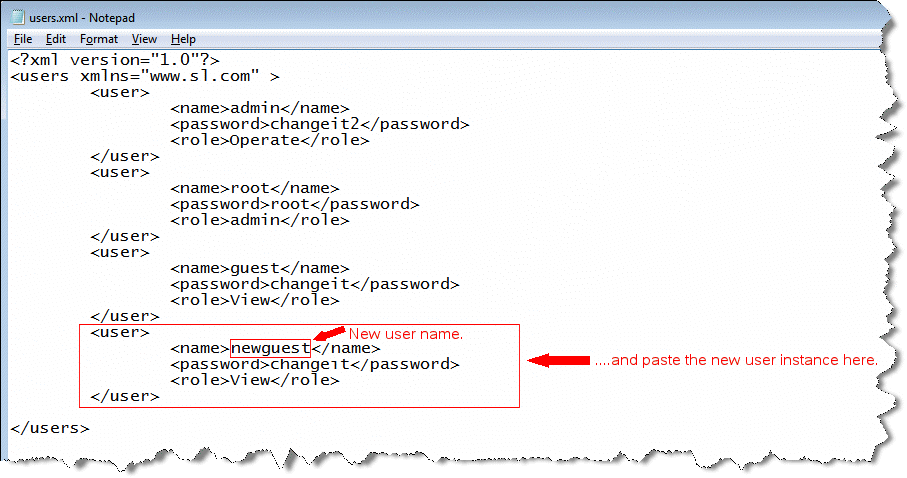
You can also add additional users through the users.xml file. To do this, copy the user instance in the users.xml file and paste it as a new user instance underneath the existing instance. Then, change the name of the new user instance to a new and unique name, as shown in the following images. Make sure that you save the users.xml file once you have made your changes.
Each user has a role defined to it. These roles are Operate (full privileges) and View (read-only). By default, the Operate value is assigned to the admin login, whereas View is assigned to the guest login. You can change these definitions as required in the users.xml, as shown below. Make sure that you save the users.xml file once you have made your changes.

|
| The scope of the roles, meaning what each defined user can actually see in the Monitor, is defined in the <Magic xpi installation>\Runtime\RTView\magicmonitor\roles.xml file. |
The password for each user is added as plain text. To add the encrypted password instead of plain text do the following:
· Go to the RTView_HOME/bin location.
· From this directory run the utility encode_string.bat and pass the password as argument.
· This utility will provide the encrypted password. Replace this password with the password in plain text in the users.xml.
The Magic Monitor has three main dashboards:
The Magic Monitor offers various context menu options on its different screens. These options are:
-
Refresh
-
Back
-
Next
-
Drill Down
-
Export Table to Excel
-
Export Table to HTML
-
Export PDF
-
Copy Cell Value
-
Status
-
Logout
|
|
-
Not all of the context menu options are available when using the Google Chrome™ browser because of a known Chrome issue.
-
Some of the operations like Stop and Restart the project may fail to work in the Magic Monitor Web interface due to a known Chrome issue.
|
This module collects the license usage data of all the servers which are running in the Space Cluster.
The data collection frequency can be configured by the user. The default value is 1 minute.
The collected data can be useful in analyzing reduced performance due to the lack of licenses (pending queues) for the running projects.
(Since version: 4.13)
Starting and Stopping Projects from the Monitor
