How Do I Configure Magic xpi as a Web Service Provider Working with WS-Security? (Magic xpi 3.x)
WS-Security is a high level security protocol in which both the web service request and the web service response must be digitally signed.
This means that unlike other “handshake” security protocols (SSL), it is not enough for the client and server to “trust” each other. Each request and each response must be signed using a certificate key.
According to the above description, you first need to pass certificates between the provider and the consumer.
You need to load a certificate which can be used for digitally signing the responses. To do this, follow these steps:
-
Create a new alias in the Systinet Pstore (in this example, referred to as: WsSecurityAlias).
-
Either load the certificate you need to use, or create a certificate request. Then send the request to the certificate “generator”.
-
Once you receive the certificate, load it using the new alias that you created.
You can read more about how to load a new certificate here.
Once you receive the certificate back, and you successfully load it into your Pstore’s alias (WsSecurityAlias), you need to configure your web service to use WS-Security protocol.
To configure the WS-Security protocol, follow these steps:
-
Create your Web Service service in Magic xpi, and then deploy it.
-
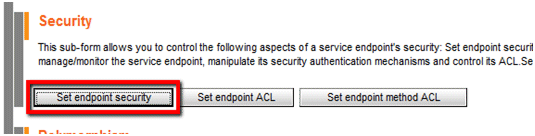
From the Systinet console, find your generated web service and do the following:
-
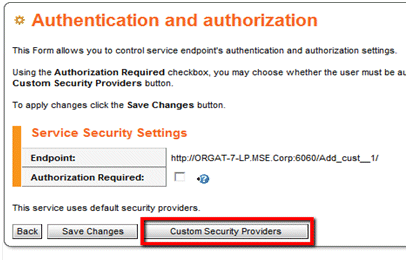
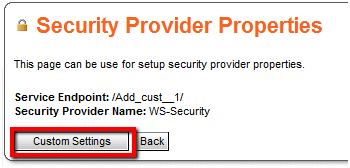
Click Set endpoint security, and then click Custom Security Providers.
-
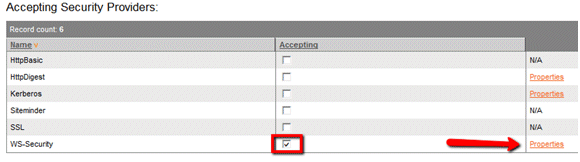
Select the WS-Security check box and click Properties.
-
Click Custom Settings.
-
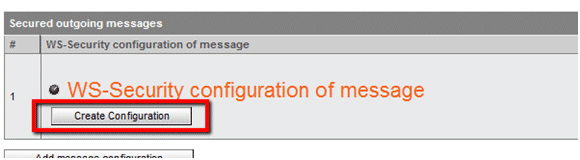
A new section will be added to the page, entitled WS-Security configuration of message. From here, you should configure a new token and a new signature, as follows:
-
Click Create Configuration.
-
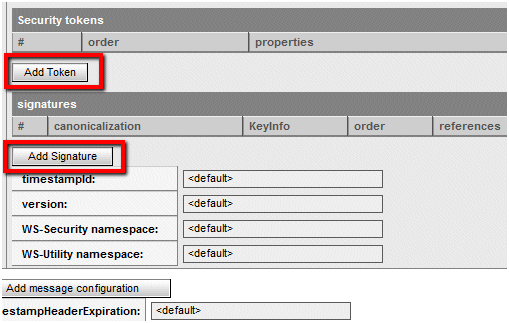
Click Add Token, followed by Add Signature.
-
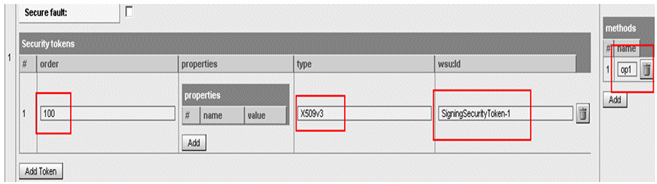
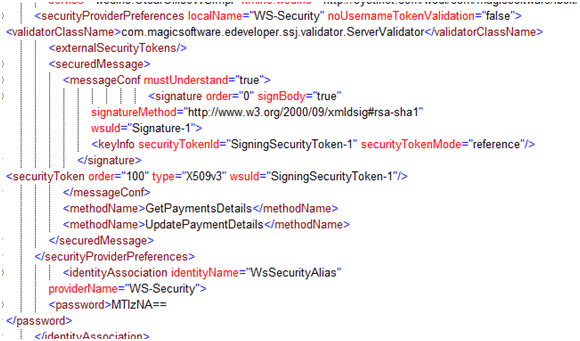
For a security token you need to configure the Public Key Infrastructure (PKI), as demanded by the certificate “generator”. For example, for a structure of an X.509 v3 digital certificate, use the following configuration:
-
For the Security tokens element:
-
order: 100
-
type: X509v3
-
wsu:Id: SigningSecurityToken-1
-
methods: The method name for each of your Web Service service methods.
-
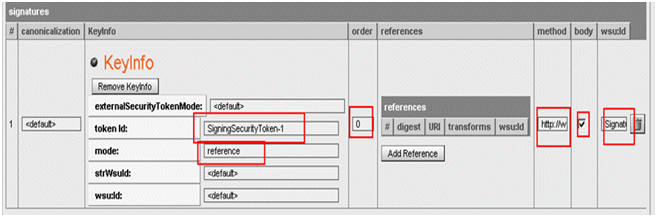
For the signatures element:
-
token Id: SigningSecurityToken-1
-
mode: reference
-
order: 0
-
method: http://www.w3.org/2000/09/xmldsig#rsa-sha1
-
body: checked
-
wsu:id: Signature-1
|
Note:
|
-
The configuration described in this section is saved in the wasp.xml file, under %WASP_HOME%\work\<your WS name>.jar\WASP-INF.
-
If you regenerate the web service, it will be generated with the default configurations. This means that the above configurations will be undone.
|
So far, you have configured a new alias and a new certificate, and then configured the WS-Security protocol and structure for the use of your Web Service service.
Next, you need to connect these two parts by associating the alias and the WS-Security configuration. To do this, follow these steps:
-
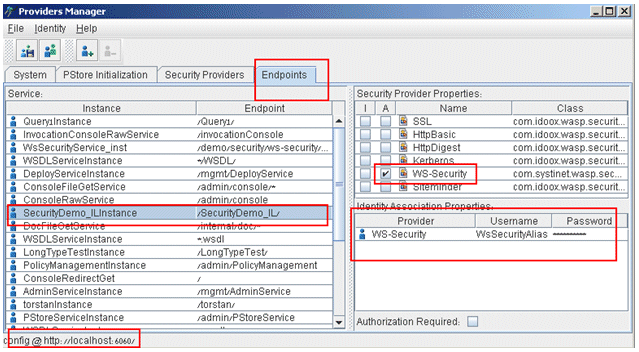
Open a utility called Providers manager. This is located under the SSJ\bin folder. You can do this by clicking Start > Run, and then entering %WASP_HOME%\ProvidersManager.bat --gui.
-
The Providers manager utility lets you associate the certificate alias from the Pstore with the endpoint. This certificate will be used for signing your web services response.
-
From the File menu, select Open Admin Service.
-
Select the Endpoints tab.
-
Find your web service in the Service window on the left.
-
Select the WS-Security check box.
-
Set the user name and password, as follows:
-
The user name should be the name of the server certificate’s alias from the Pstore.
-
The password should be the password that belongs to that certificate.