How Do I Implement a One-to-Many Relationship? (Magic xpa 3.x)
Setting up multiple tables within one HTML screen can be tricky if you are doing it manually, but it is easy using the browser-client. You can set up one or more subforms, and use a separate Magic xpa task to handle each subform independently. If the data is connected, as it is in our example, then when the data in one form changes the subform data will also change automatically.
There are three steps to setting up a one-to-many task:
-
Create the header task.
-
Create the subtask.
-
Tie the header and subtask together with a Subform control.
Let’s go through these one at a time.
-
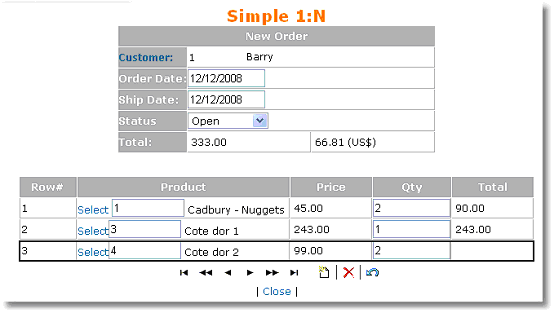
Create the header task as you would any other Browser-client task. In our example, we are displaying one Order header record.
-
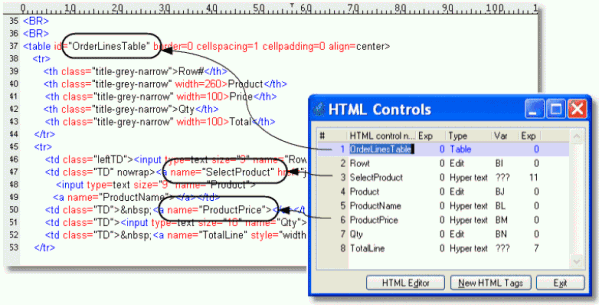
On the Order header form, create a table entry in the location you want your repeating data. Be sure to give the table an id, as this will be used in the next step.
-
Create your subtask as you would any Browser-Client task, selecting the fields you want to display on the form.
-
Select the same HTML page that you used in your parent task.
-
Create one HTML control of type Table. This control will have the same name as the id= in the HTML table control.
-
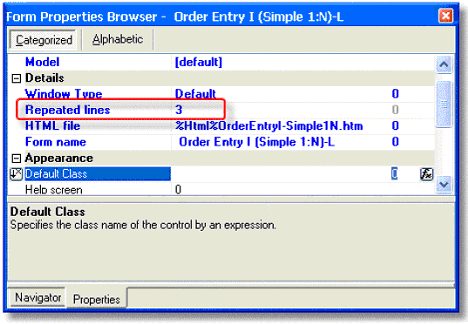
In the Control Properties for the table, set the Details line # property to indicate which line you want to have repeat. In this case, the first line of the HTML table is the header line, so the second line is the one we are repeating.

-
In the Form Properties, set the Repeated lines property to show how many times you want the line to repeat.
-
Add controls for each of the data items you want to put on the table.
-
Set up arguments to control the Range and Locate of the task, as you would for any task. In our example, we pass in the start mode and order number, so the order lines only show for the current order and the mode matches that of the parent.
-
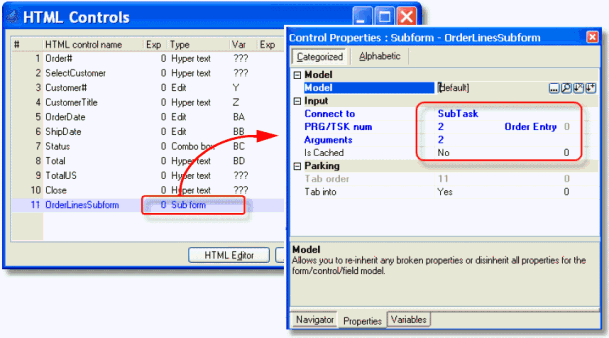
Last, you will add a Subform HTML control to your parent task. Press F4 to add a line to the HTML Controls, then select Subform in the Type column.
-
In the HTML Control properties, set the Connect to to Subtask if you are calling a subtask, or Program if you are calling a program.
-
In the PRG/TSK num field, zoom to select the subtask or program you are calling.
-
In the Arguments field, zoom to set the arguments you are passing to the called task. In our example, we are passing the mode and order number, so that the subform displays the order lines for this order, in the same mode as the parent task. This methodology is the same as that used in using subforms in online tasks, as explained in the Subforms chapter.
Now when the main task is called, it will automatically display the subtask form as well.
