How Do I Search and Replace Text in the Project’s Objects? (Magic xpa 3.x)
Sometimes it is useful to find text within your project, and perhaps change it. For instance, you might have a copy of a report or screen print, but have no idea which task was involved. Or, you may have a situation where it has been decided to change the name of a certain piece of data: using “Salesrep” instead of “Salesman” for instance, or if some hard-coded company name is changed.
Magic xpa has good facilities for both finding and replacing text, as we will see below.
-
Select Edit->Find and Replace->Find Text (Ctrl+Shift+F).
-
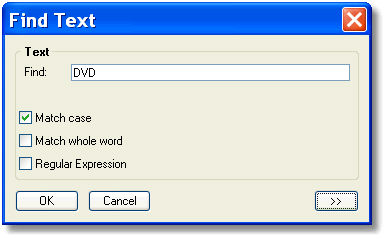
The Find Text dialog box will appear.
-
Type in the text you want to find. In our example, we chose “DVD”.
-
Check Match case if you want the search to be case-sensitive.
-
Check Match whole word if you want only whole words that match.
-
Check Regular Expression if you want to use masking characters. These are explained in the Magic xpa Help file.
-
If you click on the >> button at the bottom, you will be able to refine your search, selecting which objects you want to search.
-
Click OK.
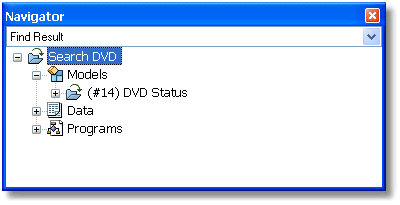
When the search is done, you will have a list of all references to the text in the Navigation pane. You can click on the results to go to the object.
Now, once you have a list of where the text is, you can save or print the list (see How Do I Save or Print the Search Results?).
Hint: While you are working with the Find Result list, you can delete the items on the list if you want (F3, or Edit->Delete Line). This is useful when you are working on a long list; just delete the items as you fix them.

-
Go to Edit->Find and Replace->Replace Text.
-
Enter the text to find, in the Find field. Here, we are looking for the text “Dvd”, and we want to match the case.
-
Enter the text to replace the found text with in the Replace field.
-
Set the other options as you would if you were just finding text as described in the previous example.
-
Click OK.
-
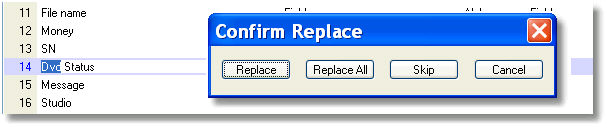
If the text is found, you will be positioned on the first occurrence of the found text, with a Confirm Replace box. Here you have the following options:
-
-
Replace: Replace this instance of the text, then jump to the next instance.
-
Replace All: Replace all instances of the text, with no more prompting.
-
Skip: Leave this text as it is, and jump to the next instance.
-
Cancel: Stop the find and replace.

-
When the Replace is finished, you well see a list of all the items that were replaced, in the Navigator. You can click on these entries if you want, to check that you replaced the correct text.
