How Do I Merge Data into a Text File? (Magic xpa 3.x)
One very useful and versatile facility within Magic xpa is the Merge functionality. While this is often used for creating web applications, it can be used to merge data into any text-type file, including XML, RTF, or HTML.
The task you use for doing a Merge will look a lot like a reporting task, looping through data and using Form Output operations to export the data. To find out more about creating a reporting task, see How Do I Create a Report?.
In this section we will go through the basics of the Merge function. More detailed information is found in the other questions in this chapter.
The basic steps for Merging data are as follows:
-
Create your text template
-
Specify your output file
-
Create your Merge form
-
Select the Tags
-
Associate each Tag with data
-
Output the merge form
Let’s look at each of these in detail.
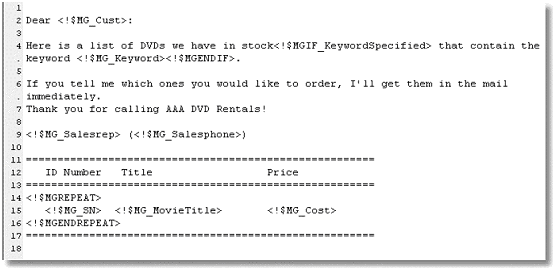
The first step in creating a Merge is to create your template. The template file can be any editable file, but in this example we are using just plain text for simplicity.
To create this template we just typed it into the text editor, named it “DVDMerge.txt” and stored it in the working directory. However, we can also edit it from within Magic xpa (see How Do I Set My Preferred HTML Editor?).

In the places where we have variable data, we use tags to tell Magic xpa that we want something replaced with data at runtime. Each tag consists of a prefix (!<MG_), a tag name, and a suffix (>). These tags are case-sensitive.
Inside the template, we can also specify repeating data using the <!$MGREPEAT> tag, and we can specify conditional text using <!$MGIF>.
How Do I Set Up Replaceable Tokens in a Predefined Template?
How Do I Condition Inserting Data into a Predefined Template?
How Do I Insert Repeatable Data into a Table Format in a Predefined HTML Template?

The task you use for creating your output file will look a lot like a reporting task, looping through data and using Form Output operations to export the data. However, there are some differences in how you specify the I/O Device and Forms.
The Media type needs to be File, and the Access needs to be Write. Specify the file name in the Exp/Var column.
Note: If you are doing a Merge for a web application, the Media will be Requester, and in some instances, where the output will be stored in a BLOB, the Media type will be Variable. However, that doesn’t affect the rest of the instructions here.
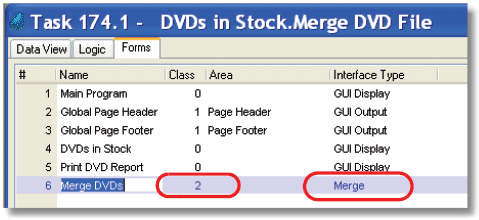
Next, you need to create a Merge form. This form is created in the Forms tab, as you would any other Form. However, in this case the Interface Type is Merge.
Also, you should set the Class to some number that is different from any other Form on the list. In this example, we have a global page header and footer that appear here, which are Class 1. So we made our Merge form Class 2.
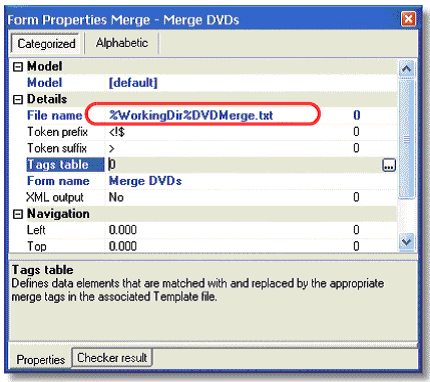
Next, go to the Properties pane of the Merge form (Alt+Enter).
The main thing you need to set up here is the File name. This needs to point to your template file. It is a very good idea to use a logical name here, to point to the spot where you keep your templates.
Once you have the template name entered here, you can edit the template by zooming on the Form name in the Form list. That is a good test to make sure you entered the template name correctly!
Also note that you can change the Token prefix and Token suffix here. If you do that, then your tags will look different. For instance, if you change the Token prefix from “<!$” to “<#%”, then the Cost tag would need to change from <!$MG_Cost> to <#%MG_Cost>. From a maintenance point of view, it is best to not change the Token prefix or suffix unless it is really necessary.
Once you have specified the file name, Zoom from the Tags table field to continue.
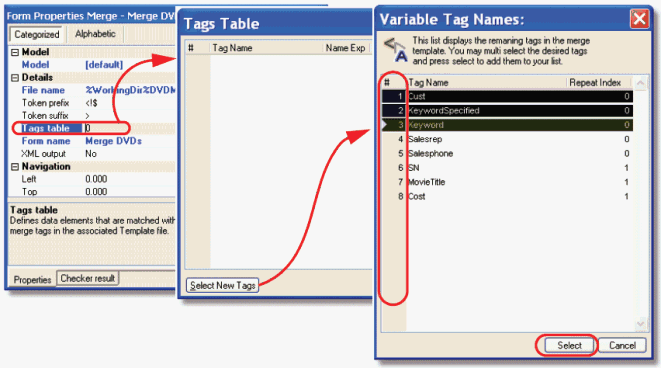
Next, you need to select your Tags. You do this by:
-
Go to Form Properties->Tags Table. Zoom (F5 or double click). If it is a new Form, you will see an empty Tags table.
-
Click on the Select New Tags button. You should see a list of Tag names from your template.
If you don’t see a list of Tags, then there are a few possibilities:
-
You have already selected all the Tags. If that is the case, then you should hear a beep and see a message at the bottom of the screen, Magic xpa couldn’t find new input tags in Template file”.
-
The Tag names are mis-typed (the prefix and suffix don’t match what Magic xpa expects).
-
The Template file name is mis-typed. You can check this by zooming from the Form name to see that it comes up in the editor.
-
Select each Tag that you want by clicking in the first column (the one marked “#”). The Tag should turn black when clicked. You can select multiple Tags by using Ctrl+Click. When you are done, click the Select button.
-
Now all the tags you selected should appear in the Tags Table, and you can proceed to the next step.
Note: You can also type in the Tag Names, but selecting them is faster and ensures that they are spelled correctly.
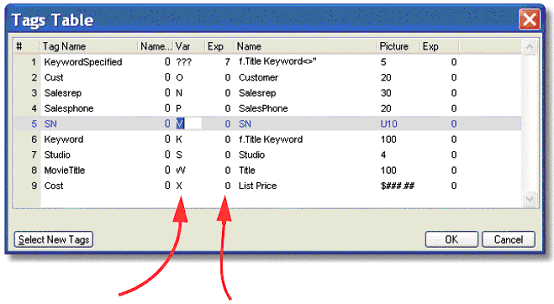
If the preceding step went correctly, the Tag Names should be filled in on your Tags Table. Now, you need to associate each Tag with a value. The value can be either a variable or an expression.
To enter a variable, zoom from the Var column. A list of all the variables available will appear. Move the the variable you want and press Enter to select it.
To enter an expression, zoom from the Exp column that is next to the Var column.
While this process is much the same as selecting data for any report, there are some differences. One major difference is that the data is automatically trimmed. Therefore, even though “MovieTitle” is 100 characters long, it does not print as 100 characters when it is merged.
Another difference is that for a Merge, there typically is no header or footer form. All the data is merged with one template. The MGREPEAT tags determine where the repeating elements are.

Last, you need to specify where the form is output. Usually this will be in Record Suffix, as you will be outputting data once from each record processed.
Here is our result:
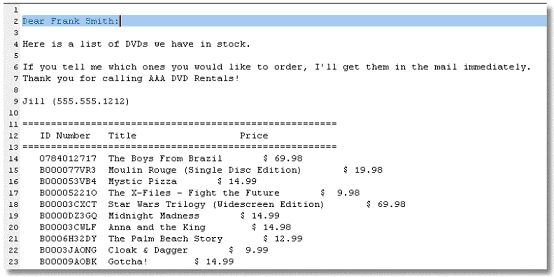
Note how the fields trimmed automatically. The customer name variable was 30 characters long, but the colon after the name is right next to the trimmed name, because the colon was right next to the tag.
However, when the Title field was trimmed, that made the Price column not line up. To get the Price column to line up, we would have to use a Tab character in the template, or use a different kind of format (such as HTML).
The Online and Rich Client Samples projects (program MG01 and RMG01)

