How Do I Manipulate the Menu Entries to Become Invisible, Disabled or Checked? (Magic xpa 3.x)
In Magic xpa, you have complete control over the end user menus. You can create your own overhead and context menus, and you can have the context menus be context-sensitive to the form or field. But you can also enable and disable entries at runtime. In this section we show you how.

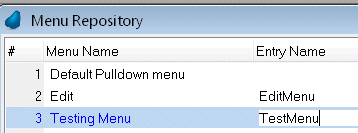
In order to enable and disable individual menu entries, you have to give each entry a unique name. This is done in the menu repository. For each menu item you want to work with, type in a unique text name. This name does not show to the user, so it can be any text you like. In this example, we have two Entry Names, “EditMenu” and “TestMenu”.
Once you have that taken care of, you can work with the MnuCheck() and MnuEnable() functions to check and uncheck, enable and disable, your menu entries at runtime.
The submenus of the main menus also have Entry Names, and these can be strung together to give a menu path. For instance, under the default pulldown menu, we have a menu named UtilityMenu, and under that, one named SetupMenu. The path is:
UtilityMenu\SetupMenu
Which we will use in the examples for MnuAdd().
In addition to the menu name, the menus are also referred to by their menu number literal. In our example above, the Edit menu is ‘2’MENU, and the Testing Menu is ‘3’MENU. We will use those literals in our MnuAdd() example.

MnuCheck() checks and unchecks a menu entry. The syntax is:
MnuCheck(EntryName, boolean)
Where:
|
EntryName is the text in the Entry Name column of the menu. This can be any text you like. It does not show to the end user.
Boolean: if true, this checks the menu. If false, this unchecks the menu.
|

|
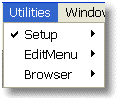
In our example, after the expression executes, the “SetupMenu” menu will be checked.

MnuEnabl() enables and disables a menu entry.
The syntax is:
MnuEnabl(EntryName, boolean)
Where:
|
EntryName is the text in the Entry Name column of the menu. This can be any text you like. It does not show to the end user.
Boolean: if true, this enables the menu. If false, this disables the menu.
|

|
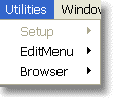
In our example, after the expression executes, the “SetupMenu” menu will be disabled.

MnuShow() allows you to make an entire menu appear or disappear. The syntax is:
MnuShow(EntryName, boolean)
Where:
|
EntryName is the text in the Entry Name column of the menu. This can be any text you like. It does not show to the end user.
Boolean: if true, the menu shows. If false, this menu disappears.
|

|
In our example, after the expression executes, the “SetupMenu” menu will not show to the user, though it still exists.

MnuAdd() allows you to add an entire menu (including the sub-menus) to a menu. You do this by creating your menu in the Menu repository, then referring to it with a menu number literal.
In addition, we use a Menu Path to specify where the new menu will be located.
The syntax is:
MnuAdd(MenuEntry, MenuPath)
Where:
|
MenuEntry is the menu literal: in this case ‘2’MENU to refer to the second menu.
MenuPath refers to where the new menu will end up. In our example:
'UtilityMenu\SetupMenu'
will locate the new menu right under the SetupMenu.
|

|

MnuRemove() is the opposite of MnuAdd(). It deletes a menu entry. It is not required that you specify the exact path: if you do not, the entry will simply disappear, wherever it was entered.
The syntax is:
MnuRemove(MenuEntry, MenuPath)
Where:
MenuEntry is the menu literal: in this case ‘2’MENU to refer to the second menu.
MenuPath refers to where the new menu will end up. In our example we did not use a menu path, because we only added the MenuEntry in one place (which is the usual case).
MnuReset() allows you to reset the menu to the default. There are no parameters; it just clears every menu alteration you have made.

MnuName() allows you to rename a menu entry. This does not effect how it works; it just effects how it looks to the user. The syntax is:
MnuName(EntryName, EntryText)
Where:
|
EntryName is the text in the Entry Name column of the menu. This can be any text you like. It does not show to the end user.
EntryText refers to the text that shows to the user. In our example it was ‘My Menu’, and as you can see, the menu entry was renamed.
|

|
The Online and Rich Client Samples projects (program EL08 and REL08)

