How Do I Limit Functionality According to the User Logged On? (Magic xpa 2.x)
You can use the Magic xpa security system to change functionality at any level within a program, by using the Rights() function in an expression. Here we will go through how to enter this function, and show a couple of useful examples.
The syntax of the Rights() function is:
Rights('a right'), which returns 'TRUE'LOG if the person has that right. So, for example, you could just type in:
Rights('Accounting Right'RIGHT)
and it would return ‘TRUE’LOG for an authorized person.
However, that’s a lot of typing, so here is the easy way to enter it:
-
Go to the Expression Editor (Ctrl+E).
-
Press F4 to open up a line.
-
Type ri, then press Ctrl+Space. This will bring up a list of auto-complete choices: choose Rights.
-
Now your expression will be: Rights(
-
From the Right-click menu, select Rights. Now you will see a list of all the Rights you have access to. Select the one you want (in our example, “Accounting Right”). This will automatically bring the text name of the Right into your Expression, so it will be:
Rights ('Accounting Right'RIGHT
-
Now just type the closing parenthesis and you are done.
You can use Boolean logic to add two or more rights, or add other conditions to the expression.
Now that we have our expression, let’s see how to use it to change the program functionality.
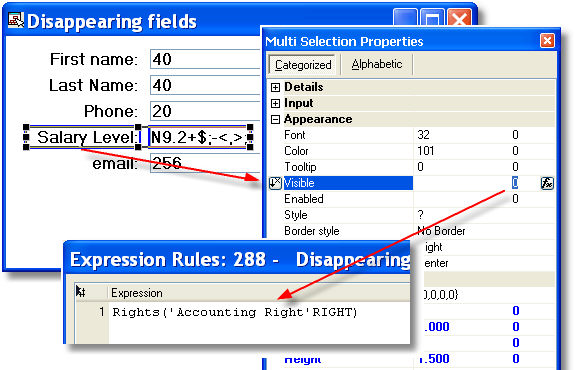
One of the most common things you need to do with security levels is to make data disappear from a screen. In this example we will make the “Salary level” field disappear. The method also works for push buttons though, or any other control.
-
Select the control you want to work with. If you want to work with several controls at once, press down the Ctrl key and click on the ones you want one by one. Here we selected the “Salary Level” field and its field prompt.
-
Press Alt+Enter to bring up the Properties for the control(s).
-
Go to the Visible property, to the rightmost field.
-
Zoom to select (or create) your Rights() expression.
Now, the fields will be invisible for non-authorized users.
If you want the field to be disabled, but not fully invisible, use the Rights() expression on the Enabled property instead.
Note: When you make a field disappear, make sure you also turn off any validation logic for that field. For instance, suppose you have a field “salary level” that doesn’t show up for most users. You also have a Verify error operation that says “Salary level cannot be blank”. If the user can’t fix the field, they can’t escape the error message. So the error logic needs to have the same Rights() logic as the field. This isn’t an issue though, as long as the verification logic is in the Control logic unit, because that will be disabled when the control on the form is disabled.
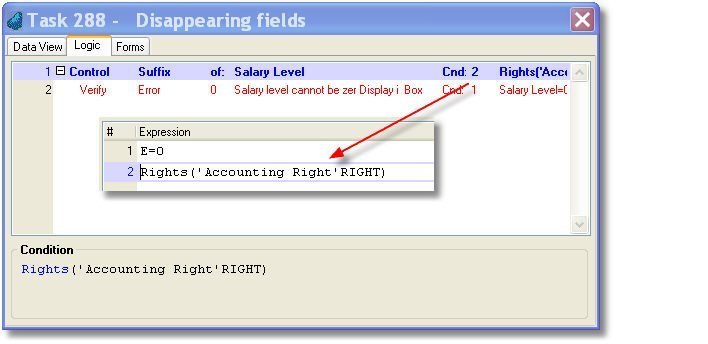
To prevent logic from executing based on a Rights() expression, just use the expression as a Condition. Here, for example, we disabled the Control Suffix, which isn’t technically necessary if you have the expression on the Control (but it might be good for documentation purposes). You can disable any operation or logic unit.
The Online and Rich Client Samples projects (program SE02 and RSE02)
