How Do I Implement Roles? (Magic xpa 3.x)
Typically, when one is implementing a security system in Magic xpa, rights are granted according to the user’s job function, which corresponds to a Magic xpa Group. That is, a user who is an Accountant will have a different set of menus and screens than a person who is an Engineer. Other rights, however, may only be granted to certain individuals, such as the ability to print paychecks or fix timecards.
Some care must be taken when designing the system, because creating too many very specific rights makes the system unwieldy, but making it too general might not give enough flexibility.
In any case, the steps for setting up your user roles are as follows:
-
Set up your Rights
-
Set up your Groups
-
Set up your Users
Let’s look at each of these steps.
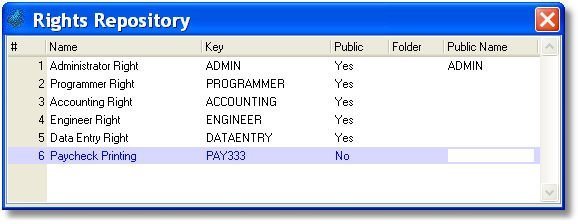
Rights are set up within each application, in the Rights repository. The Rights can have Public Names and be used as part of a Component.
To enter a Right:
-
Press F4 to open up a line.
-
Type in the Name. This can be any text you like. It will be what shows up when you access the Rights list to select a Right for an expression or authorization entry.
-
Type in the Key.
-
Select Public=No if required (See below for more explanation on this).
-
Give the Right a Public Name if needed.
If you enter No in the Public column, then the Right will be effectively hidden from anyone who doesn’t already have that Right. In our example, Paycheck Printing is a non-public right. If the Supervisor knows the key -- PAY333 -- then that person can enter that to give themselves or someone else the right to print paychecks.
This is necessary because Magic xpa allows a default Supervisor to log in and set up the initial rights, when no Rights file exists. If you want to keep certain items secret from even the Supervisor, then use a non-public Right.
However, you should use this feature with care, because if you forget your login and the key, you will be stuck.
Groups are not set up within your application. They are stored in the Security file. This file can be shared between several Magic xpa applications. You can check the location of the security file by looking in Options->Settings->Environment->Security file, but you can’t edit the file directly because it is encrypted. To set up your Groups, therefore, you need to use Magic xpa’s tools.
Prerequisite: First you need to be sure you are logged in as Supervisor. See How Do I Declare Administrator Rights in an Application? for more information about that.
-
Select File->Close Project. Now you will be at the Magic xpa Startup screen.
-
Choose Options->Settings->User Groups. A list of User Groups will appear. There will always be one group, by default, the SUPERVISOR GROUP.
-
Press F4 (Edit->Create Line) to add a line.
-
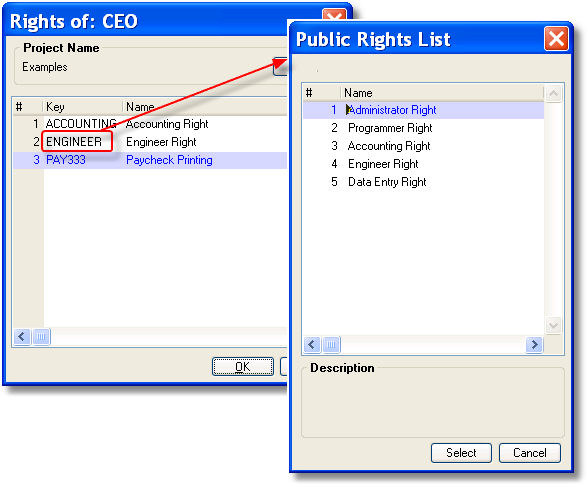
Name the group whatever you like. We’ll call ours “CEO”.
-
Tab over to the Rights column, then zoom. You will see an empty list, because no Rights exist yet for this group. For each Right you want to add:
-
-
Press F4 (Edit->Create Line) to add a line.
-
Type in the Key, or zoom to select it from a list.
-
If the Right is a non-Public Right, then you can’t select it from a list; you have to type it in. In our example we typed in our non-Public Right, PAY333.
Continue until you have created the Groups you think you will need (you can always add more later).

Now, while you still have your application closed, you can set up your Users.
-
Select Options->Settings->User IDs. A list of User IDs will appear. There will always be one User, by default, the SUPERVISOR.
-
Press F4 (Edit->Create Line) to add a line.
-
In the User ID column, type in the user’s login ID. Since this can be passed in from the operating system, using the network login is a good idea.
-
In the Name column, type the user’s name. This field isn’t used by Magic xpa, but you can use it to display the user’s full name when you need to.
-
Zoom from the Password column to create the login password (you won’t need a password if you are logging in via the network).
-
Zoom from the Groups column to assign the user to one or more Groups.
-
For each Group you want to add for this user:
If you planned your Groups carefully, you probably won’t need to add individual Rights to one user. But if you do, you can add them from the Rights column.
