How Do I Create a Selection List Program? (Magic xpa 3.x)
One of the more common types of programs is the selection list type of program. In this type of program, a list of items is presented to the user. The user can scroll up and down or use keystrokes to locate the desired item. Pressing Enter selects the item that is currently parked on, and “brings it back” to the current field.
These programs are very easy to create in Magic xpa.
-
In the Program repository, press F4 to open up a line.
-
Give your program a name. This name is not used by Magic xpa, so you can use any naming convention you like.
-
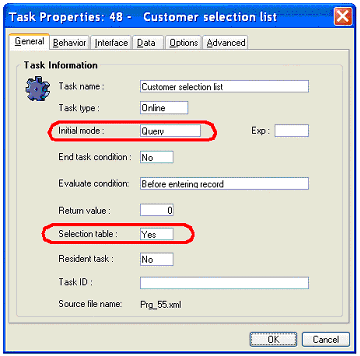
Zoom (F5) on the program name. Because this is a new program, you will see the Task Properties dialog box. Select:

You want query mode because you don’t want to be modifying the data accidentally while searching for an item.
The selection table option changes way the engine operates. When Selection table is Yes, then when the user presses Enter, the Record Suffix logic unit will execute and the task will end.

-
In data view, select the data source you want to list. In the data source properties, set access to read so the records won’t get locked.
-
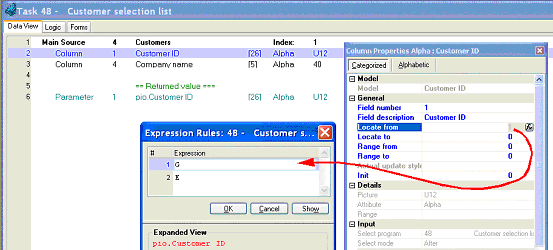
Also in the data view, create one parameter. This parameter should use a data model for the value you are sending back. In this example, we are using the Customer ID, and using the Customer ID model (#26). Note that the name of the parameter is similar to the name of the value we are selecting; it’s a good idea to name them differently so you don’t update the wrong variable. In this case, we used the prefix “pio.” to mark the one that is the parameter.
-
Use the parameter as the Locate From property for its counterpart in the table. That is, in this case, we are passing in a Customer ID and we will locate on the Customer ID in the data source.

-
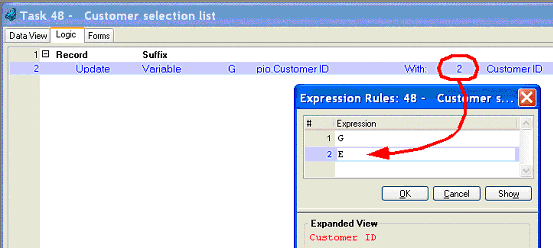
In the Logic Editor, create a Record Suffix logic unit. In that logic unit, update the parameter to the value in the data source. This is where the selected value gets sent back to the calling program.
-
Last, create your form, which will be a simple Table control. You can do most of the work by using Ctrl+G to generate the form (see How Do I Automatically Generate a Default Form Layout?).

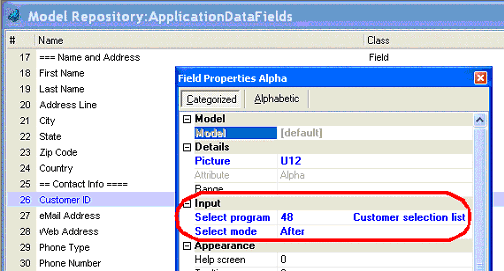
The easiest way to use a selection list is to attach it to a model or control in the Select program property. Notice that there is no explicit parameter passed here. The Customer ID is passed implicitly, whenever the model is used.
Note: If you are selecting from only a small set of data, using a combo box that is attached to a table is a good alternative to a selection list.
The Online and Rich Client Samples projects (program TS16 and RTS16)

