How Do I Create a Report? (Magic xpa 3.x)
Magic xpa makes it easy to export data to spreadsheets and report writers, using the automated data dumping tools (see How Do I Dynamically Export the Dataview of a Task into an XML, HTML, Text, or CSV file?). These are useful when you want to allow the end users to work with the data dynamically.
However, Magic xpa also has excellent report writing capabilities build right into the Studio. Writing reports in the Studio is useful when you are creating standardized reports, such as a monthly billing summary, or forms, such as invoices or bills of landing.
Here we will go through the basics of creating a simple report.
You would create a complex report using the same procedures, but probably with more fields and using some more advanced features, such as:
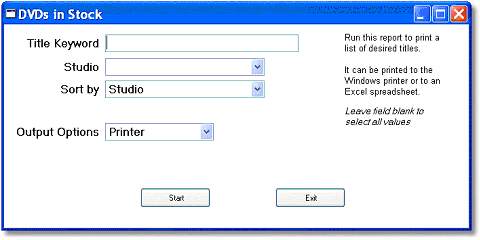
While not absolutely required, it is a good idea to give the user some kind of screen to start the program, typically with some text that indicates the title of the report and what it is for, and whatever output choices you are giving the user. This is a very simple Magic xpa online task (for details about creating online tasks, see How Do I Create a Simple Program?).
Often the same screen can be used to output the same report in either a GUI report format, or as output to Excel. You can also give the user choices about print preview or sort order.
It is a good idea to come up with a company standard for these kinds of launch tasks. This helps in training users, and it also means you can copy one task to create the next one.
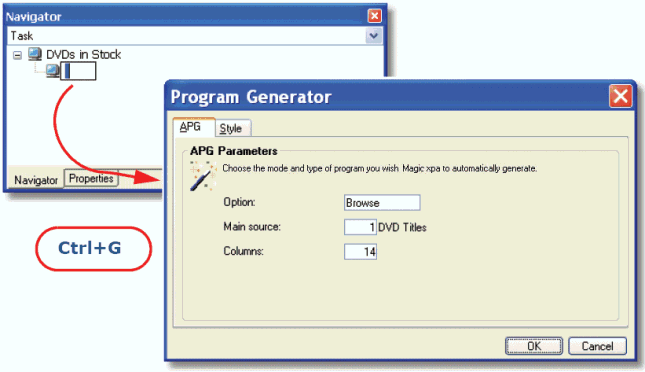
Use the Generate program utility to create a simple browse task. (See How Do I Create a Quick Browse Program?).
Set your Start button to call this task. If the start button works correctly, you should see the browser on the screen.
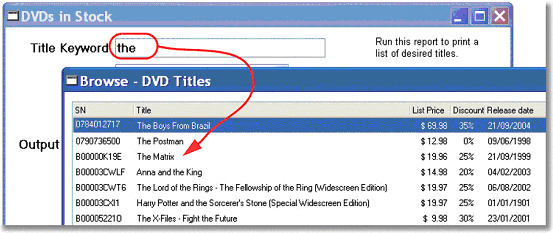
One of the bigger headaches in creating reports is making sure the ranges and sorts work correctly. This is far easier to debug with an online task, which is why we are starting out this way.
If you have multiple sort or output options, you may need to call different report tasks depending on which options the user chose. But, once you get one report finished, you can just copy the subtask to serve as a template for the next version.

When you are done debugging, change your subtask into a batch task by changing Task Properties->General->Task type to Batch.
Also, unless you are going to be updating records, make sure that Task Properties->Data->Transaction Mode is Physical and Transaction Begin is None (transactions can slow down reports). Similarly, check that the Access property of the Main source is Read.
Last, change the form that shows to the user so it is very simple and not a table. Delete the generated table, then drop a field or two on the form so the user gets some message to see something is running. You don’t want a lot of activity going on in the form though. Repainting the screen is another thing that can slow down the report, and some reports are very big.
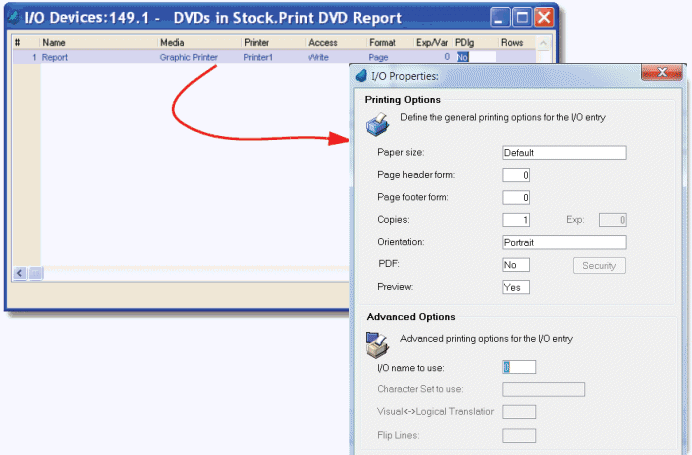
Next, you need to set up an I/O device for the report. The I/O device definition does a lot of the formatting for the report automatically, and the type of the I/O device determines how it prints.
-
Go to your report subtask.
-
Press Ctrl+I, or select Task->I/O Devices.
-
Press F4 to open up a line on the list of devices.
-
Set Media to Graphic Printer.
-
Go to the I/O Properties (Alt+Enter). Set Preview to Yes. Print preview will help you in your testing.
As you can see, there are plenty of other options you can set here. If you position the cursor on any of them and press F1, you can view the Help file for them.
When testing, Print preview is very useful. In production however, you might want to use print dialog (let the user route it directly to the printer). If you want a print dialog, you would enter Yes in the PDlg column.
Or, you might want to force the report to go to a specific printer, as would usually be the case for printing documents on specific forms, like checks. In that case, you would set PDlg to No, and also set Preview to No.
Most of these options can also be set to expressions too.
Next you want to create your forms. The basic steps are:
-
Go to the Forms tab.
-
Press F4 to open up a line.
-
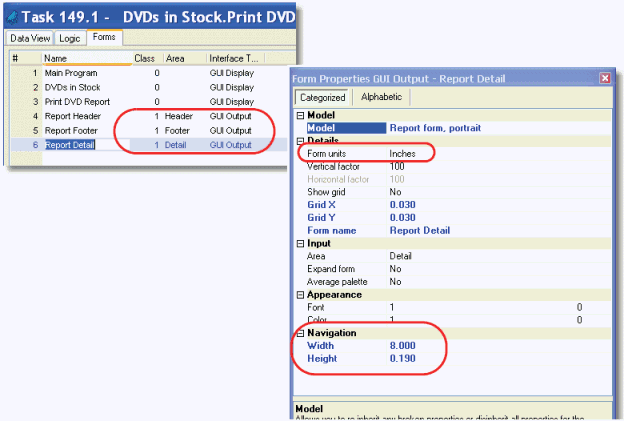
Give your form a Name, and a Class that is not zero.
-
Set the Area depending on the function of the form. For this example, make one Page Header, one Page Footer, and one Detail form.
-
Set the Interface Type to GUI Output.
In the Form Properties, it is important that the Form units are set to Inches or Centimeters. If you use Dialog Units, the form will resize itself, which you don’t want. Make sure the Width is the size of your paper. The Height will vary for each form, and is easily resized with the mouse.
It is best to use a Model for the report form. That way the width, font, and form units are all set up automatically and consistently.
Hint: If the forms are way too big to edit easily, set the size manually before you zoom into it. Just type in a reasonable size for the width and height in form properties.
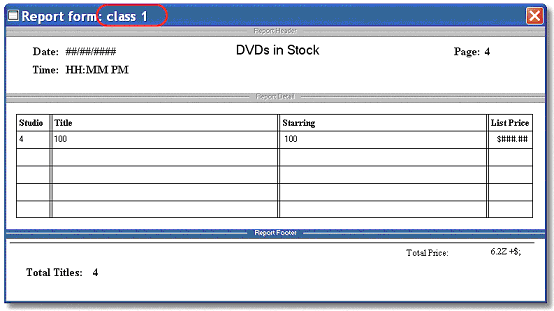
When you zoom on any of the class 1 forms, you will see all three of the forms together. The header will appear at the top, and the footer at the bottom, even though they are not listed that way in the form list. Sometimes it is convenient to edit just one or two forms at the same time. In that case, just set the class number temporarily to something else, and you can edit those forms separately.
At this point, you edit the form as you would an online form, selecting fields and dropping them onto the form. It is very helpful to have standard models for the various types of fields.
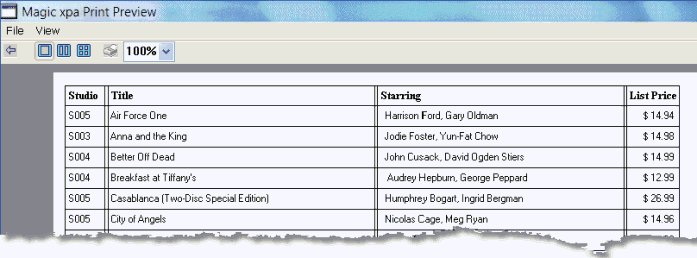
The Detail form is basically a table. It is shown here in the default table format to make this clear, though likely for most of your reports you will turn off the dividing lines. It is created like any other table: drop a table control onto the form, then drop the fields onto it.
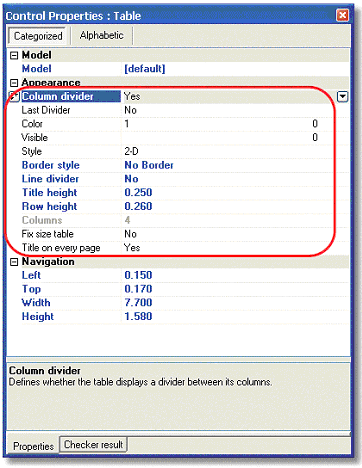
When a table control is included on a report, the options are slightly different than when a table is on an online form. There is a property, Title on every page, which controls whether or not the title row automatically is printed. Usually, you want this to be Yes.
Another property is Fix size table. If Fix size table = Yes, then, if there are more records than will fit, the table repeats.
If Fix size table = No, then the table will resize to fit the data. It will repeat on the next page, if necessary.
The amount of white space around the table on the form is retained, just as it is on online forms.
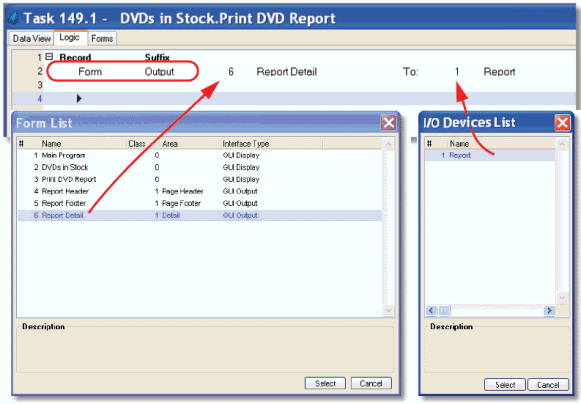
Now, you just need to make the report actually print. Usually the detail line is printed once per record, so we print it in a Record Suffix event, as shown in this example. However, if it is a summary report, it would be in a Variable change event. You can print any of the forms in any event you want.
-
Go to the event where you want to print the form (Record Suffix, in our example).
-
Press F4 to open up a line.
-
Select the Form operation by typing F. The next field will default to Output, which is what you want.
-
Zoom to select the form you want to print.
-
The To: field will default to I/O device 1, which is usually what you want. If there is more than one I/O device though, you can zoom to select a different one here.
Now when you print the report you will see in the print previewer:
Now all we need to do is add the header and footer.
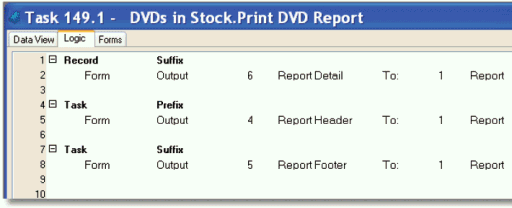
To print the report header, repeat the procedure for printing the detail line. However, the header is usually printed for the first time in Task prefix. From then on, it will be automatically reprinted whenever a form is first printed on a new page. There can be more than one form defined as a “header,” and all of them will print when a new page is started.
Alternatively, you can define a Form as a Page Header, in which case it will automatically print at the top of any page, and it does not need to be manually output in Task prefix. (See How Do I Define Page Header and Footer Information?).
The report footer is printed in Task suffix, after the rest of the report has printed.It only prints once, for this report -- after the last record has printed -- so putting it in Task Suffix makes sense. Footers often print at break levels too, to print subtotals. These are explained in How Do I Define Aggregates per Break Level?.
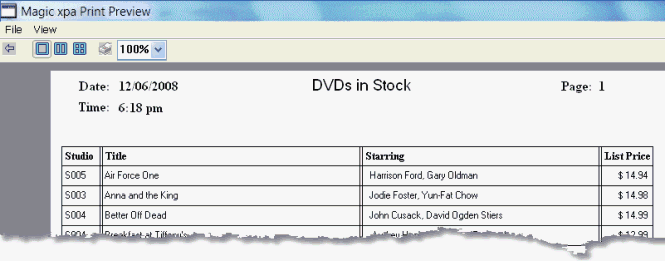
Now the report prints with headers and footers.
How Do I Create Report Break Levels?
How Do I Define Aggregates per Break Level?
How Do I Include All Data From a Multi-Line Control in My Report?
How Do I Set Repeating Captions for a Table in a Report?
The Online and Rich Client Samples projects (program RP03 and RRP03)
