Deploying a Web Service Using Several Machines (Magic xpa 3.x)
This Technical Note explains how to install and configure Magic xpa, the Magic xpa broker, and the Systinet server to provide Web services when installed on several machines.
There are scenarios in which a user would like to provide a Web service, but have Systinet, the Magic broker and the engine running on separate machines.
This document describes the needed installations on each machine and the required configuration to allow communication between the various components.
This document relates to a Runtime configuration only. It takes into consideration the fact that development has finished and the application is deployed with the Web service that it provides.
A. Systinet installation and configuration to communicate with the broker
-
To install Systinet manually, there is a need to first extract its installer from the Magic xpa installation exe file. Run the following CMD command:
Magic_xpa_Installer.exe /Extract_All: A path to an existing folder
-
The result is a folder named Disc1 with the Magic xpa installation files. Under the JAVA folder there is a file named: systinet-server-java-6.5.2.jar, it is the Systinet installer.
-
Manually install Systinet by entering the following command line:
java -jar systinet-server-java-6.5.2.jar
Note that the systinet-server-java-6.5.2.jar file is located in the extracted directory under Disk1\Java.
-
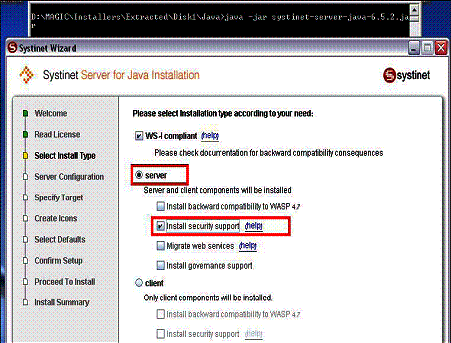
Select the Security Support option, as shown below. After step 3 of the installation, use the defaults by clicking Next.
-
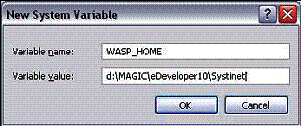
Set the WASP_HOME environment variable to the location of the new Systinet installation, by following this file path: My Computer > Properties > Advanced Tab > Environment Variables.
Make sure that it is defined as a system variable rather than as a user variable.
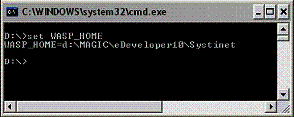
The following screen shows the expected outcome.
-
Copy the Magic xpa JAR files. These files are available in the Support directory. These files should be placed in the %WASP_HOME%\lib directory:
-
MgSSJ.jar
-
MgRequester.jar
-
saaj_utils.jar
-
Add a Scripts directory.
-
Create a new folder with the following files from the Magic xpa installation:
-
Modify the %WASP_HOME%\bin\server.bat file:
a. Copy the following line: Set WASP_CLASSPATH= %WASP_CLASSPATH%;%WASP_HOME%\lib\MgSSJ.jar;
%WASP_HOME%\lib\MgRequester.jar;%WASP_HOME%\lib\saaj_utils.jar;
b. Paste as shown below: CALL "d:\magic\Magic_xpa\Systinet\bin\env.bat"
Set WASP_CLASSPATH=%WASP_CLASSPATH%;%WASP_HOME%\lib\MgSSJ.jar;
%WASP_HOME%\lib\MgRequester.jar;%WASP_HOME%\lib\saaj_utils.jar; SET PARAMS=%*
c. Add the following line (including the quotation marks): "-Djava.library.path=Path to Newly created Scripts directory"
Please note that the above screen capture was edited. Make sure that the entire section is described in one line in the file.
B. Broker installation
-
Install the Broker on the Broker machine.
-
You can select Product Components from the standard Magic xpa installer and select the broker only.
No special configurations are needed.
C. Magic xpa installation and configuration
-
Install Magic xpa on the third machine involved.
-
Change the following section in your Magic.ini file:
[MAGIC_SERVERS]
Default Broker = 0,servicevs/5115,,servicevs//11-6-2008//14:49:30,10,,
Where servicevs is the name of the broker machine of this example.
And servicevs//11-6-2008//14:49:30 is the broker supervisor password.
