How Do I Create My First Salesforce Project? (Magic xpi 3.x)
This topic explains the first steps in creating a Magic xpi Salesforce project.
To create a Salesforce account:
-
Go to http://www.salesforce.com/developer/
-
Open a Salesforce account by filling in a subscription form on the site.
-
You should now receive an email with a login URL. Click the URL to change your password.
-
After you have changed your password, you should ask for a security token:
-
Click on the Setup link at the top of the page.
-
In the My Personal Information section, click on the Reset your security token link to receive an email containing a security token. You will use this later on, when you add the security token to your password, and enter the combined result in the Password field in Magic xpi’s Connections Salesforce dialog box. For example, if the password is 1234, and the security token is AABBCC, you should enter 1234AABBCC in the Magic xpi password field.
|
Note:
|
You do not need the security token for logging into the salesforce.com web site. The token is used only when you use external applications such as Magic xpi.
|
-
You should now go to https://login.salesforce.com/. Here, you can log in to your Salesforce application.
To create a simple Salesforce project:
In this example, a Query operation is performed for all Channel Customers account types.
Configuring the connection to Salesforce:
-
Open the Magic xpi Studio, and create a new project.
-
From the Project menu, select Resources to open the Resource Repository.
-
Click New. The New Resource dialog box opens.
-
Select a Salesforce resource type from the drop-down list. In the Resource Name field, enter a name for your new Salesforce resource, and click OK.
-
Enter your Salesforce server user name and password in the relevant fields. The password is a combination of your Salesforce password and the security token that was supplied by salesforce.com.
-
Click Validate to test your new connection.
-
Once the connection has been validated, click Objects List to retrieve the updated supported object list.
-
Click OK to close the Resource Repository dialog box, and to save your connection definitions.
Configuring the Salesforce connector:
-
Drag a Salesforce connector to the flow area.
-
If this is the first time that you have dragged the Salesforce connector to the flow area or the trigger area of the Magic xpi Studio, the Component Properties dialog box opens.
-
Click Configuration to open the Salesforce Configuration dialog box.
-
Click  next to the Object field, and select the Account object.
-
In the Operation field, select Query from the drop-down list.
-
Press CTRL+L to open the Variables for Flow dialog box. Here, define a new BLOB variable called F.ResultBlob.
-
Click  next to the Store Result In field, and select F.ResultBlob to hold the returned XML data.
-
Click OK to go open the Data Mapper’s Source/Destination Management dialog box.
-
Click Map to open the main Data Mapper screen.
-
In the Destination side, double-click on the Type element, and enter Customer – Channel in the Node Properties dialog box’s Calculated Value field. This allows you to query only the channel customers.
-
Click OK several times, until you exit the configuration screens.
Mapping the Salesforce XML query result to a flat file:
-
Drag a Data Mapper component into the flow as a child to the Salesforce connector, and click Configuration.
-
Create a new XML Source type, and click Properties.
-
Select the account XSD file. You can find this under
<project name>/salesforce/XSD/<Salesforce.com connection name>/Account.xsd
-
Select F.ResultBlob as the data source.
-
Create a new flat file Destination type, and click Properties.
-
In the Data Destination field, select File from the drop-down list. You should give it the following value:
EnvVal('currentprojectdir')&'ChannelAccounts.txt'
-
In the table area, click New three times to create three Alpha fields.
-
Rename the new fields to Name, Country, and Website.
-
Click OK, followed by Map.
-
Map the Name Source node to the Name Destination node.
-
Map the BillingCountry Source node to the Country Destination node.
-
Map the Website Source node to the Website Destination node.
-
Click OK until the Data Mapper is closed.
Running the flow:
-
Run the project in Debugger mode. Use the step to follow the Salesforce query result, and check that the ChannelAccounts.txt file is available and that it contains all the channel records.
-
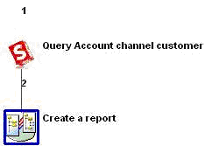
The final flow should look like this:


