Consuming Web Services Over SSL with Magic xpa (Magic xpa 3.x)
This Technical Note explains how to configure Magic xpa and Systinet to consume Web services over SSL.
It also includes an additional SSL-related configuration procedure in which a change of the SSL server certificate is described.
Some Web services are available only when working in a secure fashion. One of the most common protocols is SSL (Secure Socket Layer). These Web services are recognizable by the ‘s’ in their URL, such as: https://www.example_url.com.
This section describes the various configurations possible with the Magic xpa and the Systinet server to both provide and consume such Web services.
Magic xpa supports working with SSL in several configurations:
-
When the server should be a trusted server but requires no client authentication.
-
Using mutual authentication in which both the server must trust the client and the client must trust the server back using certifications.
This document also describes the procedure needed to change the default certificates provided by the Systinet installation to other certificates.
Consuming Web Services Over SSL
When consuming Web Services over SSL we need to configure the Systinet server to use the certificates provided by the Web service vendor.
In some cases, small changes are required in the Magic xpa program and the Services table to ensure that we use the correct certificates.
Configuring a Client Certificate for Mutual Authentication
When provided with a client certificate, the following steps need to be taken to load the client certificate into Systinet.
|
Note:
|
It is recommended to save a local copy of the WSDL and work from there, because the client certificate is not used when loading the WSDL.
|
-
Open the PStore Tool by typing the following command in the CMD window:
%WASP_HOME%\bin\PStoreTool.bat --gui
-
Open the client configuration file by using the PStore menu and selecting:
%WASP_HOME%\conf\clientconf.xml
-
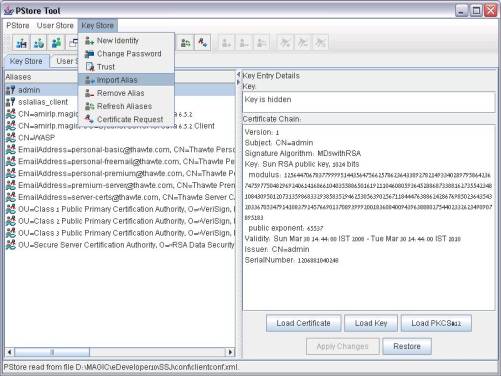
Use the Key Store menu to import a new alias:
-
Give the new alias a name (to be used by your Magic xpa program) and click the Load PKCS#12 button. Provide the client certificate (.pfx or .cer files) and its password:

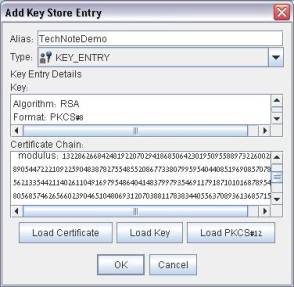
This alias name and password should be used by the WsSetIdentity function in your Magic xpa program prior to the Invoke Web Service operation.
Configuring a Server Certificate
This procedure is needed if the vendor demands all clients “trust” the server:
-
Navigate to the WSDL URL through your Web browser (mutual authenticated Web services will require the vendor’s certificate at this stage).
-
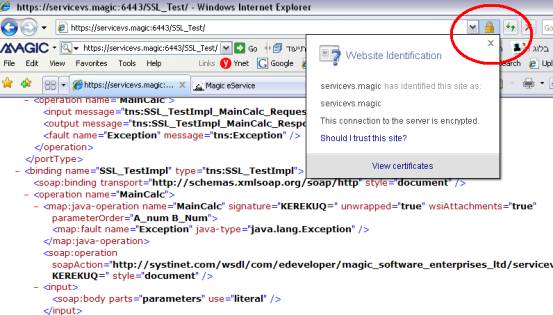
Find the security icon and click to display the certificate:
-
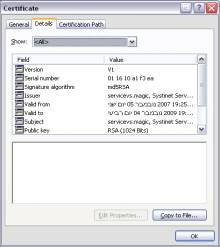
Click to view the certificate and move to its Details tab:
-
Save the certificate to a file by clicking the Copy to File button (use the defaults).
-
Open the client-side PStore Tool using the command:
%WASP_HOME%\bin\PStoreTool.bat --gui
-
Click the PStore menu and select Open from file.
-
Open the clientConf.xml file, which is located in the SSJ\Conf directory.
-
From the Key Store menu, select Import Alias.
-
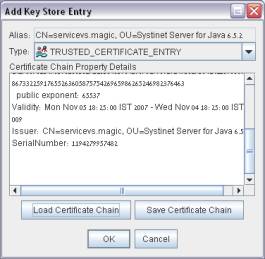
Change the Type to TRUSTED_CERTIFICATE_ENTRY, click the Load Certificate Chain button, and provide the *.cer file that you just saved:
-
Click OK. The server is now “trusted” by the client.
Magic xpa Program and Services Table
The changes required to consume a Web service over SSL on the Magic xpa side are:
-
In the Magic xpa program, use the WSSetIdentity function just before executing the Invoke Web S command.
The parameters needed are the Pstore alias as the user name parameter and the certificate’s password as the password parameter.

The above function call, as seen in the image above, is required whenever a client certificate is used.
-
Change the Security tab of the service in the services entry (Environment/Services).
-
Enter the property sheet of the service entry and move to the Security tab. Change the Security Level to Transport and the Authentication Type to SSL.
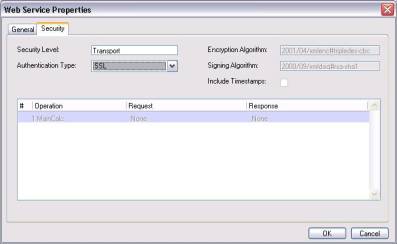
The above setting is required when using a client certificate.
Changing the SSL Server Certificate
The default certificate of Systinet server is issued to machineName.Domain.
Changing it to any other certificate is possible and requires taking the following steps:
-
Open the PStore tool using the command:
%WASP_HOME%\bin\PStoreTool.bat --gui
-
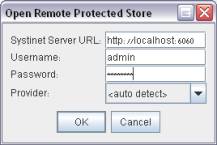
Use the PStore->Open remote option (requires the server to be up and running):
-
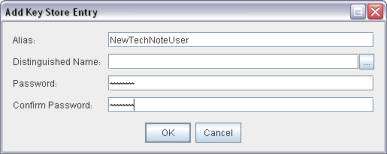
Create a new Identity from the KeyStore menu:
-
Provide a name and password.
-
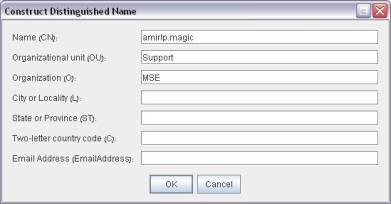
In the Add Key Store Entry screen click the Distinguished Name button and add the required information:
-
Right click this new identity and select Certificate request from the context menu, It is critical that the certificate request comes out of your machine.
-
Save the certificate request as a TXT file and generate a certificate using a CA (Certification Authority).
-
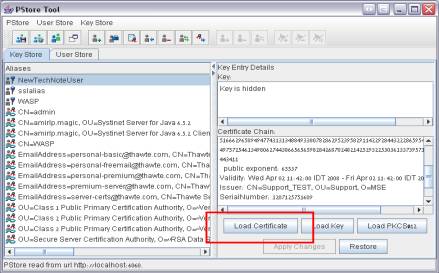
Load the new certificate to the new identity by clicking the Load Certificate button when parked on the new identity.
-
Select the file (*.cer) created by the CA (certificate authority).
-
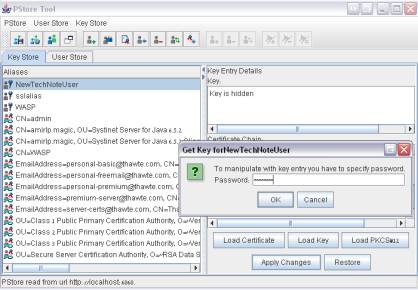
Confirm by clicking the Apply Changes button (the identity password is needed).
-
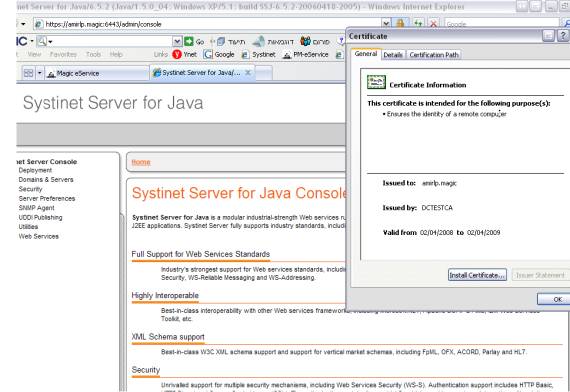
Make sure that the certificate’s issuer is trusted. Note that the issuer of the example certificate is DCTESTCA.
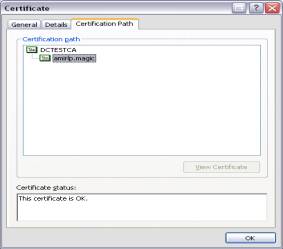
The steps needed to make the certificate’s issuer “trusted” are as follows:
-
Open the certificate (as shown above) and park on the issuer line. The View Certificate button should become available. Click it and a second certificate will open.
-
Move to the Details tab and click Copy to file saving a *.cer file to your file system.
-
In the PStore tool use the KeyStore->Import alias option and change the Type to TRUSTED_CERTIFICATE_ENTRY. Click the Load Certificate Chain button and provide the .cer file.
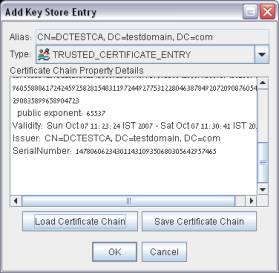
-
Open the ServerConf.xml file from the SSJ\Conf directory.
-
Change the httpsPreferences section by giving the new identity as the alias and the new identity’s password as the password:
<httpsPreferences name="https">
<alias>NewTechNoteUser</alias>
<defaultTimeout>40000</defaultTimeout>
<maxIdleTime>500</maxIdleTime>
<maxReadTime>40000</maxReadTime>
<maxThreads>255</maxThreads>
<minThreads>5</minThreads>
<needsClientAuth>false</needsClientAuth>
<nonProxyHosts>localhost</nonProxyHosts>
<password>TechPass</password>
<port>6443</port>
</httpsPreferences>
-
Restart Systinet and go to the console. Use the original login details (admin, changeit) when logging on.
